Advanced Typography - Task 1 Exercises 1&2
05/04/2023 - 11/05/2023 / Week 1 - Week 5
Jason Antony / 0356335
Advanced Typography / Bachelor of Design (Hons) in Creative Media
Task 1: Exercises 1 & 2
Lectures
Week 1 Lecture 1
Advanced Typographic Systems
Typographic systems help to focus and lead decision-making by providing a
feeling of purpose.
Shape grammar is a set of shape principles that are applied step by step to
construct a set of designs, or language.
- Axial System: All elements are arranged on either side of a single axis.
- All elements are extended from the point of emphasis in a radial system.
- Dilatational System: All elements extend in a circular fashion from a central point.
- Elements appear to have no discernible pattern or relationship.
- Grid System: A vertical and horizontal division system.
- Transitional scheme: An unofficial layered banding scheme.
- A modular system is a collection of non-objective pieces that are assembled into a standardized unit.
- Bilateral System: All text is symmetrically placed on a single axis.
Week 2 Lecture 2
Advanced Typography: Typographic Composition
Design composition principles include emphasis, isolation, repetition,
balance (symmetry/asymmetry), alignment, viewpoint, rhythm, and
contrast.
The Rule of Thirds: A Photographic Composition Guide. The crossing
lines serve as a guide for positioning the points of interest within
the available area.
Environmental Grid: Based on the exploration of an existing structure
or a combination of structures.
Form and Movement: Inspired by the investigation of existent Grid
Systems. The positioning of a form on a page, or over multiple pages,
generates movement. Images, text, or color could be represented by the
shapes.
Week 3 Lecture 3
Advanced Typography: Context and Creativity
The first mechanically created letterforms were intended to closely
resemble handwriting. Handwriting would become the foundation or
standard for shape, space, and traditions that mechanical type would
attempt to imitate.
The first genuine writing system, written from left to right and
derived from pictograms.
- Ideograms symbolise the objects they depict.
- As descriptors to establish that the preceding signs are phonograms
and to convey the general notion of the word.
- Phonograms are used to represent sounds that "spell out" individual
words.
Early Greek (5th C. B.C.E.): Drawn freehand, without compasses or
guidelines, and with no serifs. The strokes of these letters became
thicker over time, the aperture shrank, and serifs formed.
Roman Uncials: By the 4th century, Roman letters were becoming more
rounded; the curved form required fewer strokes and allowed for faster
writing.
English Half Uncials (8th C.): The uncial evolved into a more slanted
and condensed form in England.
Carolingian Minuscule: capital letters at the beginning of sentences,
spaces between words, and punctuation. This style established the
template for Humanistic writing in the fourteenth century, which
became the foundation for the current lower-case Roman type.
Black Letter (12-15 C. CE): This style is distinguished by tight
spacing and condensed lettering. The letterform was dominated by
verticals that were evenly spaced. Condensing lines and letter space
lowered the amount of expensive materials used in book
manufacture.
The Italian Renaissance: Newly rediscovered letterforms Antica. The
Renaissance analysis of form that was being applied to art and
architecture was directed toward letterforms — resulting in a more
perfect or rationalized letter.
The oldest writing found in the ‘Indian’ subcontinent the Indus Valley
Civilization (IVC) script (3500-2000 BCE), is as yet undeciphered and
seems to have been somewhat logo-syllabic in nature.
The earliest writing system developed in India after the Indus script.
It is one of the most influential writing systems; all modern Indian
scripts and several hundred scripts found in Southeast and East Asia are
derived from Brahmi.
Week 4 Lecture 4
Advanced Typography: Designing Type
Type Design Process
1. Conduct research
- Be familiar with type history, anatomy, traditions, and nomenclature.
- Determine the type's purpose or what it will be used for, as well as
the various applications in which it will be used.
- Investigate existing fonts that are currently in use for
inspiration/ideas/reference/context/usage pattern/etc.
2. Traditional/Digital Sketching
3. Professional digitization software: FontLab and Glyphs App. Some
designers utilize Adobe Illustrator in addition to specialty font
programs. Purists, on the other hand, frown upon this.
4. Evaluation
The results of the testing are used to refine and correct features of
the typeface. Prototyping is also a component of the testing process and
provides valuable feedback. The readability and legibility of the
typeface become a significant issues depending on the typeface category
(display type/text type). However, it is not as crucial if the typeface
is a display type, where the expression of the form takes a little more
precedence.
5. Deployment
Even after deploying a completed typeface there are always teething
problems that did not come to the fore during the prototyping and
testing phases. Thus, the task of revision doesn’t end upon deployment.
The rigor of the testing is important so that the teething issues remain
minor.
Typeface Development
Using grids (with circular forms) can help with letterform building and
is a feasible way to build/create/design your letterform.
Considerations and construction
When designing a new type, several forms and constructions must be
considered. Extrusion of curved (and projecting) features past the
baseline and cap line (overshoot) is a significant optical adjustment.
This also holds true for the vertical alignment of curved and straight
structures.
Fitting the type: The space between letters must also be visually
corrected. The letters must be changed to have a consistent visual white
space - the white space between the letters must be the same.
Ink traps were commonly employed when printing on low-absorbent paper
and when printing quickly and accurately. Excess ink gathers at the
corners, but with ink traps, the corners remain visible.
Week 5 Lecture 5
Advanced Typography: Perception and Organisation
Contrast

Fig. 1.1 Size (by Carl Dair)

Fig. 1.2 Weight

Fig. 1.3 Form

Fig. 1.4 Structure

Fig. 1.5 Texture

Fig. 1.6 Direction (by Carl Dair)

Fig. 1.7 Colour

Form: The overall look and feel of the elements that
make up the typographic composition. To represent a concept by
doing so in a visual form. The interplay of meaning and form
brings a balanced harmony both in terms of function and
expression.
When a typeface is perceived as a form, it no longer reads as a
letter because it has been manipulated by distortion, texture, and
enlargement, and has been extruded into a space.

Fig. 1.9 Gestalt theory for organization
Instructions
Task 1: Exercise 1 - Typographic Systems
For this exercise, we are to explore 8 systems which are Axial, Radial,
Dilatational, Random, Grid, Modular, Transitional, and Bilateral in InDesign
using the content given in the MIB. We were also instructed to watch the
InDesign demonstration videos in the lecture playlist.
- Size 200 x 200 mm
- Colours: Black and additional color
- Minor graphical elements
Task 1: Exercise 1 - Typographic Systems
InDesign Progress
I didn't do any sketches because I prefer to work instantly in the software
when it comes to layout designs. It just allows me to visualize my ideas
better.
Week 1 attempts
Layouts
Axial System

Fig.2.1 Axial Guides and Grids (11/04/2023)
During our week 1 practical, we were instructed to attempt the axial system
first. It took me some time to get used to using InDesign once more after a
break of several months. I wanted to incorporate an angle for every line of
text. It seemed like an interesting concept to me.
Fonts used:
Left: Futura Std (Bold, Book)
Right: Futura Std (Condensed Extrabold, Condensed Medium)
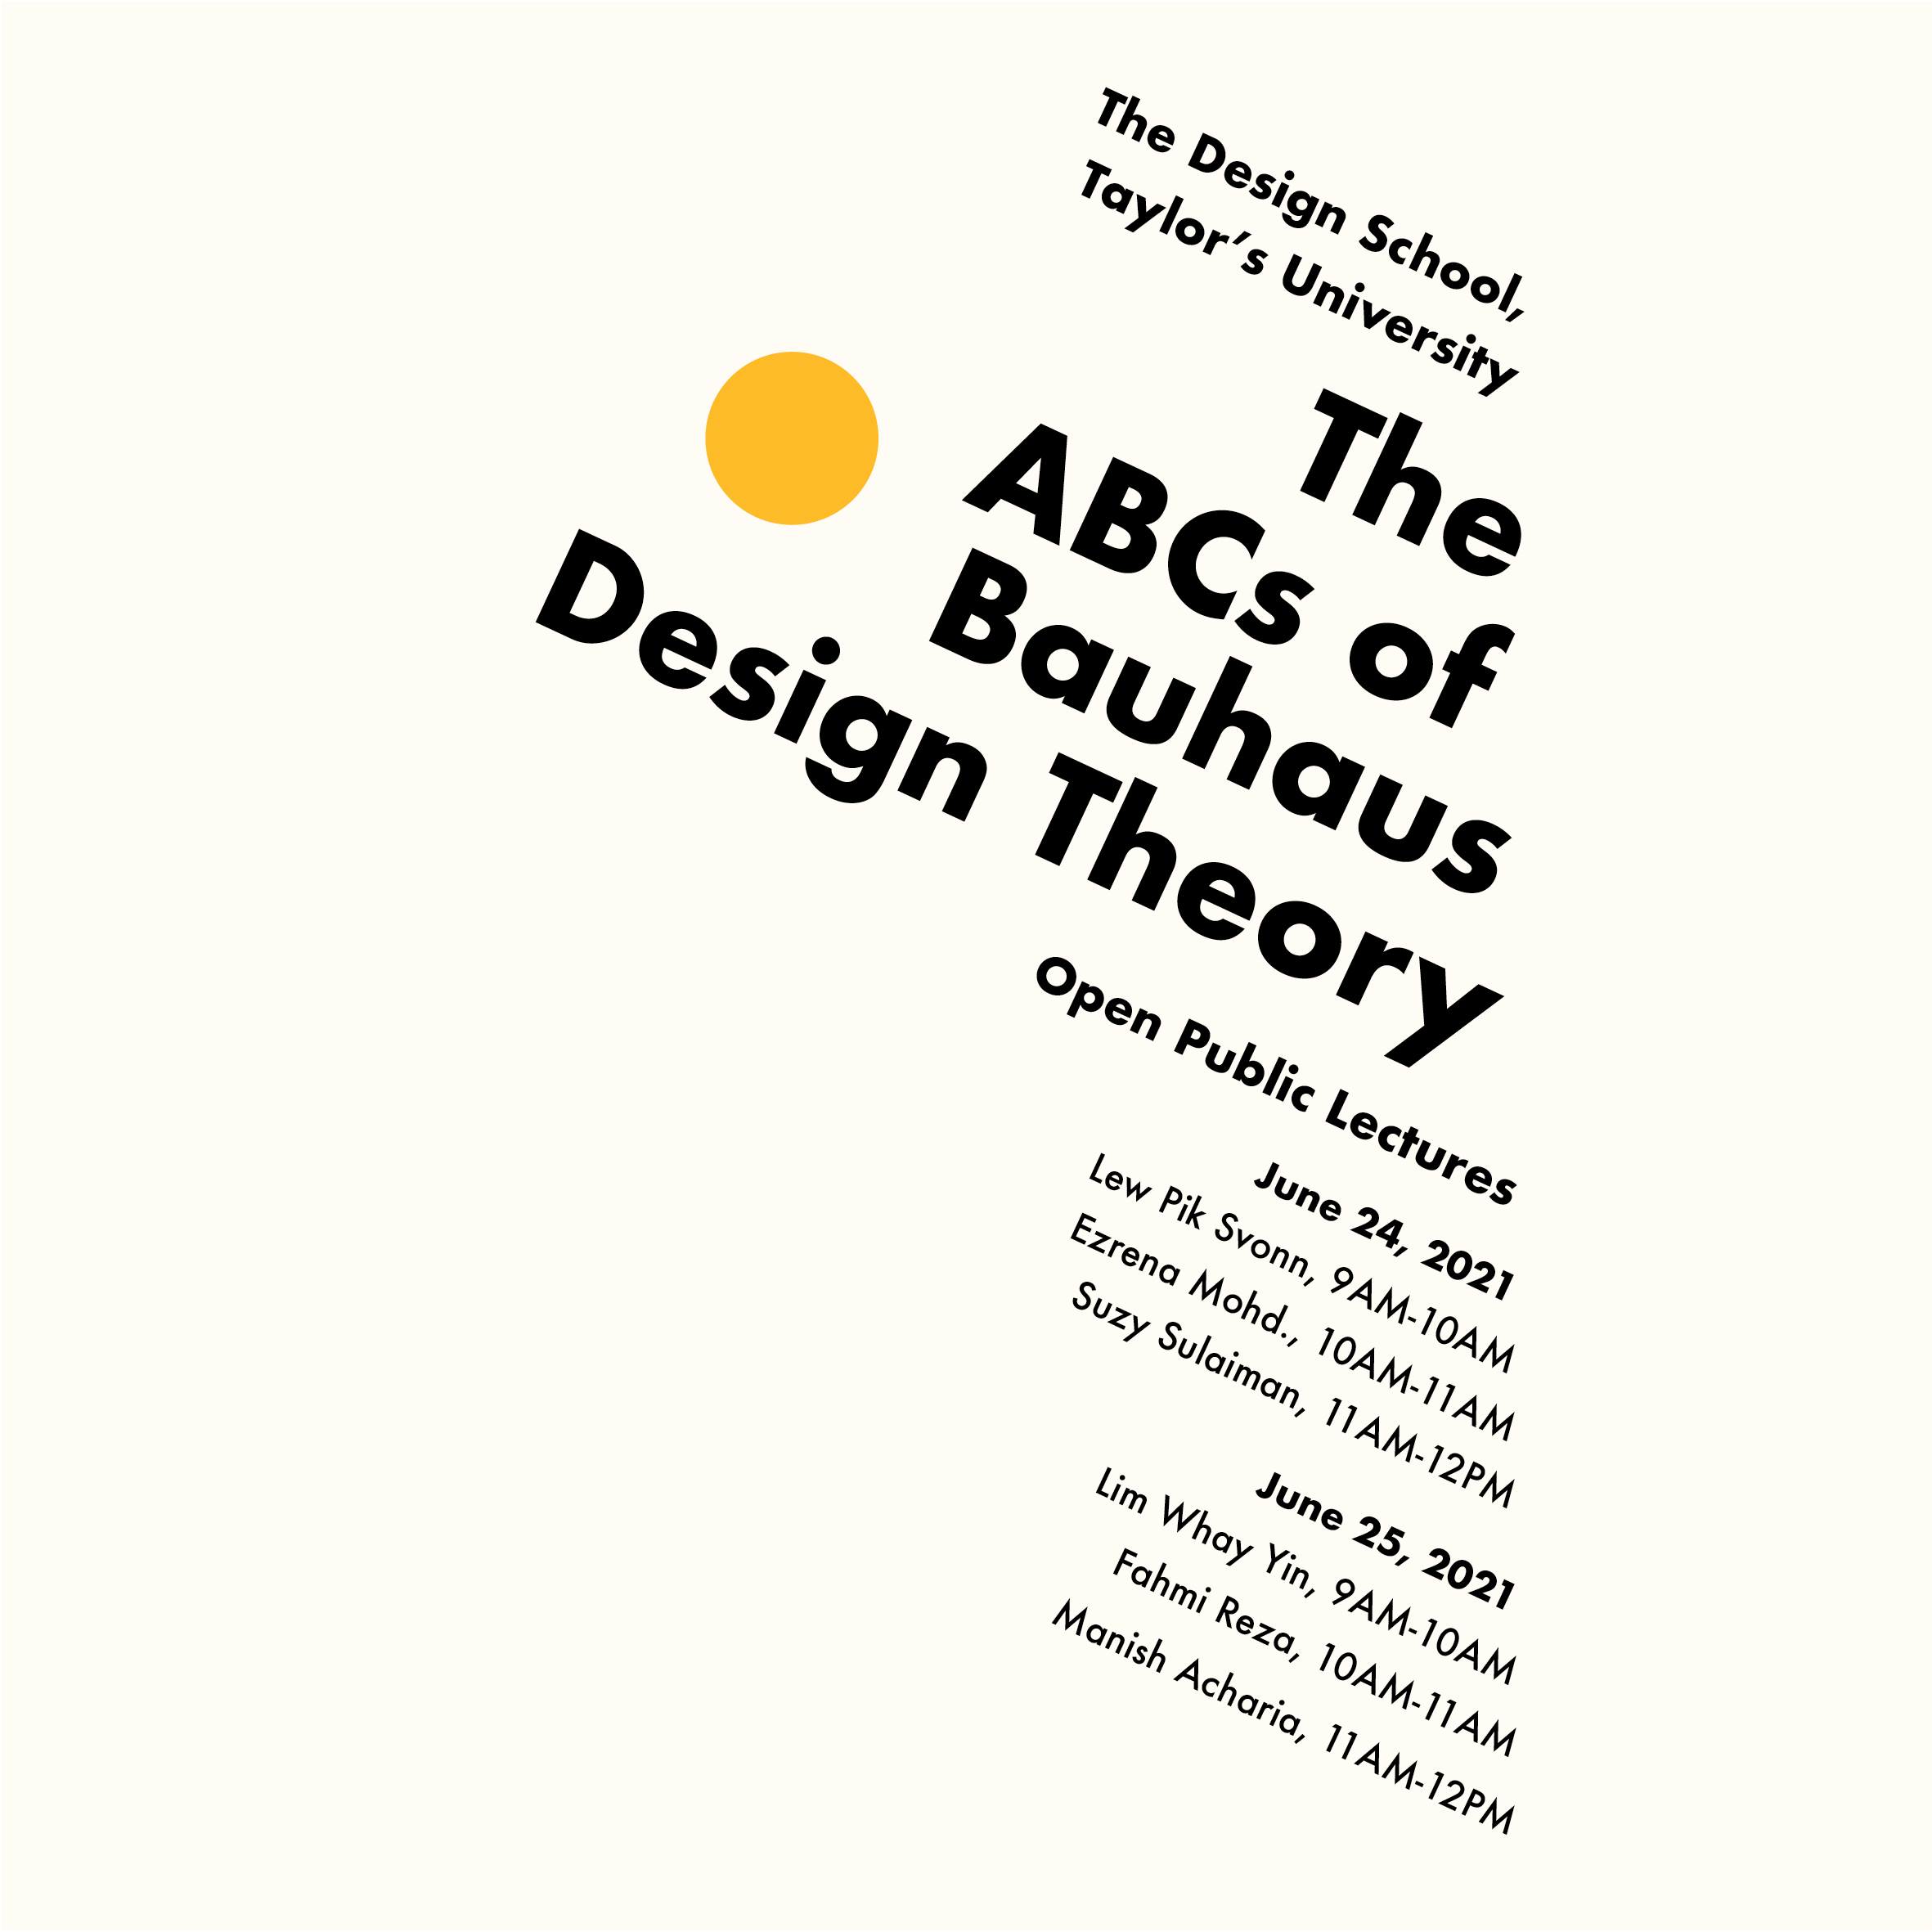

Fig.2.2 Axial (11/04/2023)
Radial System

Fig.2.3 Radial Guides and Grids (11/04/2023)
For the radial system, I wanted to create a balanced design. So I picked two
corners of the canvas to be my focus points. I was also trying to create a
light ray look/pattern for the second design.
Fonts used:
Left: Futura Std (Bold, Book)
Right: Futura Std (Bold, Book)


Fig.2.4 Radial (11/04/2023)
Dilational System

Fig.2.5 Dilational Guides and Grids (11/04/2023)
The dilatational system was a system I struggled with. At first, it was hard
to think of exciting designs. For the left design, I attempted to make
the shape look like an & symbol. For the right design, I was more
focused on the balance of the designs.
Fonts used:
Left: Futura Std (Bold, Book)
Right: Futura Std (Bold, Book)


Fig.2.6 Dilational (11/04/2023)
Grid System

Fig.2.8 Grid Guides and Grids (11/04/2023)
The layout on the left is bold and striking to me. I repeated the word
design to emphasize the word and to also make the layout more balanced.
However, Mr. Vinod said the kerning is awful.
Fonts used:
Left: Univers LT Std (63 Bold Extended)
Right: Futura Std (Bold, Book, Light)


Fig.2.9 Grid (11/04/2023)
Modular System

Fig.2.10 Modular Guides and Grids (11/04/2023)
I really love the left design as it is bold and in your face. the modules in
this layout are the rows and columns of the canvas, excluding the gutters.
Mr. Vinod asked me to correct the contrast of the yellow and White.
Fonts used:
Left: Futura Std (Extra Bold, Bold)
Right: Futura Std (Bold, Book, Light)
Right: Univers LT Std (63 Bold Extended)


Fig.2.11 Modular (11/04/2023)
Bilateral System

Fig.2.12 Bilateral Guides and Grids (11/04/2023)
The bilateral system was also one of the more difficult ones since
everything is centralized. It is simple to create a monotonous pattern. To
combat the boringness, I tried to make an interesting typographic title
(right design) by using a mixture of light italics and bold fonts from
different type families.
Fonts used:
Left: Univers LT Std (63 Bold Extended)
Right: Univers LT Std (63 Bold Extended), Bodoni Std (Book Italic)


Fig.2.13 Bilateral (11/04/2023)
Transitional System

Fig.2.14 Transitional Guides and Grids (11/04/2023)
For the left design, I was inspired by the glitch and error look, hence why
I some lines are repeated in different styles, colors, and sizes.
Fonts used:
Left: Most of the sans serifs
Right: Univers LT Std (93 Black Extended)


Fig.2.15 Transitional (11/04/2023)
Random System

For the left design, I wanted to create a design that looks like a hive,
hence the pile of text in the corner. For the right design, I wanted to
mimic a pile of stuff that had fallen from the sky. Mr. Vinod said both my
designs need more balance because there is too much negative
space.
Fonts used:
Most of the 10 Typefaces


Fig.2.17 Random (11/04/2023)
Week 2 Revised


Fig 2.18 Improvements from Week 1 (14/04/2023)
Random system - added a few more texts to balance and fill the awkward white
space. It also adds a falling effect, which is pretty neat in my opinion.
Grid system - Corrected the kerning and tracking of the text in the system.
Dilatational system - Gave more space between the lines of body text.
Modular system - Increased contrast for better visibility between
texts.
Final Task 1 - Exercise 1: Typographic Systems

Fig.3.1 Final works
JPEG

Fig. 4.1 Final Axial System - JPEG, (14/04/2023)
Fig. 4.2 Final Random System - JPEG, (14/04/2023)
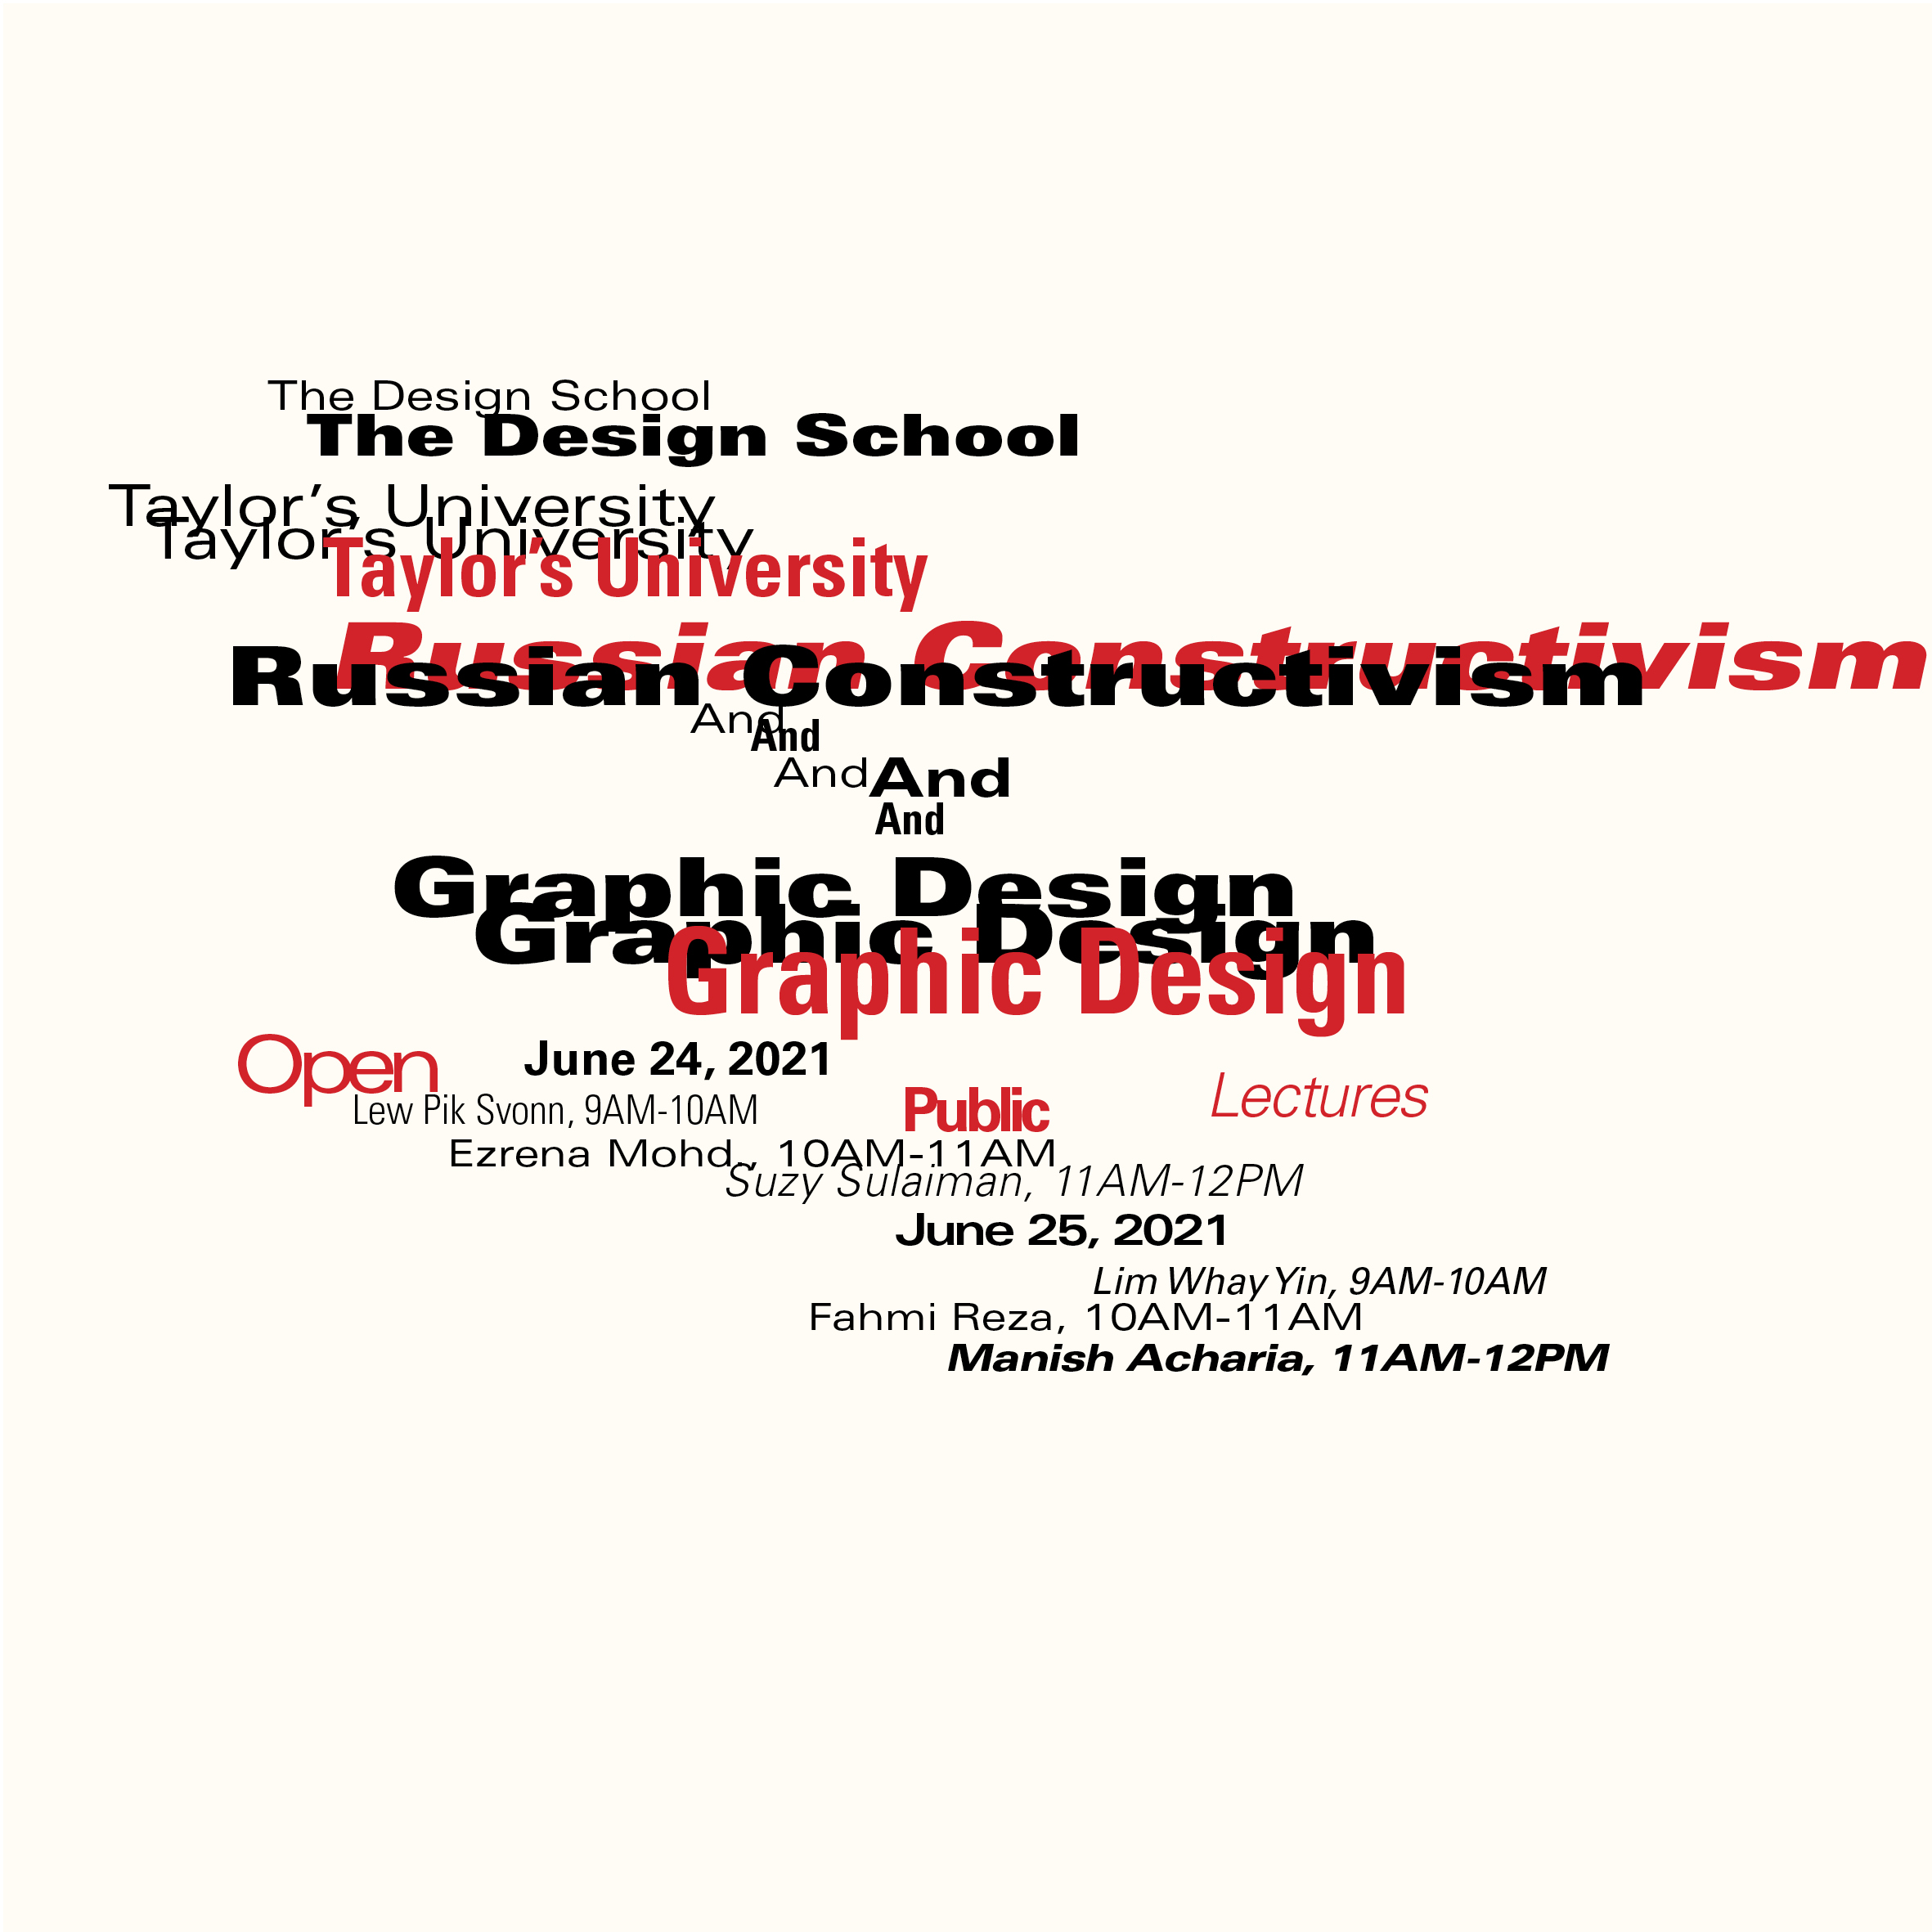
Fig. 4.3 Final Transitional System - JPEG, (14/04/2023)

Fig. 4.4 Final Bilateral System - JPEG, (14/04/2023)
Fig. 4.5 Final Modular System - JPEG, (14/04/2023)
Fig. 4.6 Final Dilatational System - JPEG, (14/04/2023)

Fig. 4.7 Final Radial System - JPEG, (14/04/2023)
Fig. 4.8 Final Grid System - JPEG, (14/04/2023)
PDF
Fig. 5.1 Final Task 1 - Exercise 1: Typographic Systems - PDF, (14/04/2023)
Fig. 5.2 Final Task 1 - Exercise 1: Typographic Systems - PDF with guides
and grids, (14/04/2023)
Task 1: Exercise 2 - Type and Play
For exercise 2, we are tasked to analyze, dissect and identify potential
letterforms (4 letters only) within a chosen image of a subject - organic
or man-made.
- Uppercase or lowercase only
- Choose a reference typeface from the 10 typefaces
Chosen picture

Fig.6.1 Tracing from bacteria (18/04/2023)

Fig.6.2 Tracing from railroad nails (18/04/2023)
Letterform Extraction

Fig.6.3 Extracted Letterforms (18/04/2023)
Bacteria - L, I, F, E,
The letterforms were blobby and bacteria-like. Could be refined into a playful sans-serif typeface.
Railroad Nails - L, O, V, E,
The letterforms were angular and sharp, Could be refined into a unique serif typeface.
Further Exploration

Fig.7.1 Further Exploration 1 (25/04/2023)

Fig.7.2 Further Exploration 2 (25/04/2023)


Fig.7.3 Extracted Letterform from Fig.6.1 (25/04/2023)


Fig.7.4 Extracted Letterform from Fig.7.1 (25/04/2023)

Fig.7.5 Extracted Letterform from Fig.7.2 (25/04/2023)
Through the study of edge fidelity, folds and ridges can be identified
within the subject. This gives the letterforms we are trying to extract
the authenticity of the subject's unique characteristics.

Fig.7.6 Superimposition Analysis (25/04/2023)
The letterforms, when superimposed have similar characteristics despite
their unmatching proportions.
Refining Process

Fig.8.1 Futura as a reference font (25/04/2023)
I chose Futura as my reference font because of the reliability of its
proportions as a sans-serif. I also decided to start my refining process
from the letterforms extracted in Fig. 7.5.
Process

Fig.9.1 Iteration Process Outlines (25/04/2023)

Fig.9.2 Iteration Process Fill (25/04/2023)

Fig.9.3 Adobe Illustrator Workspace (25/04/2023)

Fig.9.4 Refined L (25/04/2023)

Fig.9.5 Refined I (25/04/2023)

Fig.9.6 Refined F (25/04/2023)

Fig.9.7 Refined E (25/04/2023)
Poster attempts
I wanted to incorporate my text into a petri dish, where bacteria is
cultured.

Fig.10.1 Poster Experimentation 1 (25/04/2023)

Fig.10.2 Poster Experimentation 2 (25/04/2023)
I used Photoshop to make these posters. Although there are no depth
effects used for these posters, I accentuated the sense of
movement.
Week 4 Revision


Fig.11.1 Refined Letterforms Week 5 (27/04/2023)
Mr. Vinod Said the gaps in the letterforms should be more visible.

Fig.11.2 Letterforms as 3D (27/04/2023)

Fig.11.3 Illustrator Workspace for 3D (27/04/2023)

Fig.11.4 Photoshop Workspace (27/04/2023)

Fig.11.5 Photoshop Workspace Updated (05/05/2023)
Final Task 1: Type and Play
Fig.12.1 Final L JPEG (27/04/2023)
Fig.12.2 Final I JPEG (27/04/2023)
Fig.12.3 Final F JPEG (27/04/2023)
Fig.12.4 Final E JPEG (27/04/2023)

Fig.12.5 Final Spread JPEG (27/04/2023)

Fig.12.6 Final Movie Poster JPEG (05/05/2023)
Fig.12.7 Final PDF (25/05/2023)
Feedback
Week 1:
General Feedback: complete the blog
Specific Feedback: Interesting design for 1st axial system. Dates should
be smaller to give more contrast and hierarchy.
Week 2:
General Feedback: finalize the first exercise in the blog
Specific Feedback: Minor improvements can make big changes. Several designs
need those minor improvements. Mind kerning and tracking.
Week 3
General Feedback: forms don't necessarily need to be exactly the same as the
reference image. experiment with the font with the properties of the selected
object.
Specific Feedback: Mr. Vinod found the first extraction to be interesting,
however, it needs to be studied and analyzed more.
Week 4
General Feedback: The play between text and Image should relate and blend
with each other.
Specific Feedback: The gaps in the letterforms should be more visible. Mr.
Vinod said my Refinement process is a good example. The interaction between
type and image is excellent. May proceed to finalize the poster.
Reflection
Experience
For exercise 1, my primary challenges were trying to be creative with
the layouts while rigorously adhering to the rules and overcoming my
perfectionistic tendencies. There was additional pressure to not only
live up to expectations but also come up with layouts that were unique
since I was quite concerned that my work would resemble that of my
peers. I actually really loved the finding-type task and the concept
behind it. The method of creating type from pictures was exciting.
Observations
In exercise 1, I had to pay attention to balance in addition to the
standard typographic fundamentals like leading, point size, alignments,
etc. It's crucial to have equal weight distribution even in an
asymmetrical design or layout. I learned how to carefully examine the
letters to identify the problems that give them an unprofessional
appearance from the discovering type exercise. I also learned what it
takes to study forms and experiment on the refinement process.
Nevertheless, it was fascinating and even enjoyable to learn how to
examine an organic topic in order to recognize letters. The type and
play exercise also taught me to pay attention to the image's attributes,
including mood, color, movement, and interaction with the subject I was
attempting to merge my type with.
Findings
My perspective on typographic systems was a little bit obstinate before
undertaking exercise 1. I just felt that because they are ‘systems’,
there was little possibility for innovation. I also thought that there
weren't even systems in the first place! But certainly, after exploring
various techniques for designing the layouts, my opinions altered. Once
I understood the fundamentals and essence of the layout, I discovered
that coming up with new layouts was actually enjoyable. Lastly, after
conducting the type and picture exercise, I noticed that
fluidity/movement of the text is a critical aspect when generating an
interplay between the two.
Further Reading

Fig 13.1 Typographic Systems by Kimberly Elam (2007)
Reference:
Elam, K (2007). Typographic Systems.
Princeton Architectural Press, New York
There were a lot of variational examples that sort of led me to a
design block, so I was curious to learn more about Radial. In that
situation, I discovered that this structure provides a
compositional issue right away because each line naturally lives
as an independent unit with merely a link to a focal point.

Fig. 13.2 Radial System - Thumbnail Variations (Page 40)
Focal points do not have to be singular. Lines also do not
need to be linear as long as they diverge from a focal point.
They also do not need to hold the same angle in relation to
other lines. The positioning of text and how far it is from
the focal point also determine the emphasis and hierarchy of
information.


Comments
Post a Comment